


Showing posts with label How To. Show all posts
Showing posts with label How To. Show all posts
How to Install Windows 7 Theme in Vista - This tutorial is a guide to learning the Install Windows 7 Theme in Vista, The steps are :
1. Download Windows 7 theme that you like
1. Download Windows 7 theme that you like
First of all, you should download the official Windows 7 theme that you like. Keep in mind only the formal themes that will work, unsigned theme of the 3rd party may still pose many problems in Vista & XP, but it would not hurt if you wanted to know who exprimen anyone can ....
2. Ekstrak file Themepack & Instal
For example themepack used here is Windows 7 Style Theme, please download here ;
- Ekstrak file or Ekstract Here 'Windows_7_Style_For_Vista_by_giannisgx89.rar'
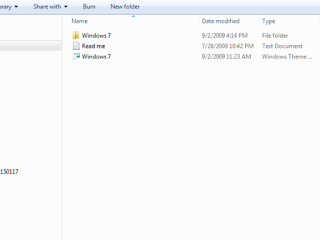
- Go to folder 'Windows 7 Style' and double-klik so it looks like in the example Fig.2 below:
- Then double-click on the folder 'Themes', then it will look like this ;
- Double-click 'window7.theme' the lowest position. For Windows Vista file format. "Theme" and Aero are compatible, while XP and Mac does not support Aero, so you can only use the wallpaper only.
 |
| Fig.1 |
 |
| Fig.2 |
 |
| Fig.3 |
To install the theme manually in Vista, how that is:
1. Copy all the contents of the folder (Folder & Windows7 Windows7.theme) to theme your windows folder, its position is at:
C:\Users\nama user kamu\AppData\Local\Microsoft\Windows\Themes
Note : your user name is the name of your computer account
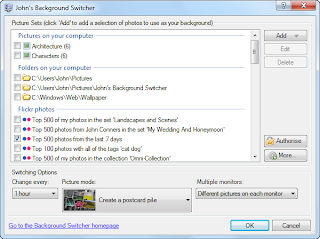
2. Download Windows 7 Background Changer for Vista
Vista does not have a built-in background changer like Windows 7, but there are many tools that can do it. The recommended one is "John background Switcher" :
3. How to Copy Windows 7 Screensaver
 |
| Fig.4 |
3. How to Copy Windows 7 Screensaver
Almost all the screensaver is compatible with Windows XP, Vista and Windows 7. That should be done is to copy the file extension ". Scr" (for screensaver) into the folder Windows Screensaver:
4. How to Copy a desktop icon
C:\ Windows\System32
4. How to Copy a desktop icon
If themepack it comes with a desktop icon, you must install it manually, step;
Good Luck ... (ThemePack-Gratis)
- Right click on your desktop - Click on "Personalize"
- Click on "Change desktop icons"
- Set each icon manually by clicking the "change icon":
 |
| Fig.5 |
Good Luck ... (ThemePack-Gratis)
As for how to install themes windows 7 can be done in several ways depending on the type of extension of its themes. If her themes was his only themespack wrote then, to install simply double click on it.
After installation you will be brought to the Personalization window where the newly installed theme will be highlighted in blue

And on this blog themes on average its only themespack its course.
If her themes was made from a 3rd party usually include in it the folder containing the icon, sound etc., so that themes replaced in its entirety, then the existing files on your computer that is; uxtheme.dll, themeservice.dll, themeui.dll (the third position of the file in C: \ Windows \ System32) should be in the patch first.
Sometimes to install themes from a third party is not as easy as installing themespack.
Sometimes to install themes from a third party is not as easy as installing themespack.
Remember! before trying this way make sure you are backing up those files .. although later on in its installation process there will be backup automatically ... Please bear their own risk Sorry if there are errors in this installation process.
This method has been tested ... and successful .. First you download File Universal Theme Patcher :
http://soft2.wmzhe.com/download/deepxw/UniversalThemePatcher_20090409.zip
or
http://windows7themes.net/themes/UniversalThemePatcher_20090409.zip
This software is made by deepxw, which works on Windows XP SP1, SP2, SP3/2003/2008/Vista, SP2/Windows 7 32bit (x86) / 64bit (x64). This software works in background and will automatically patch to the files: uxtheme.dll, themeui.dll, themeservice.dll in your windows 7.

Now extract the file and select the program that suits your windows, I demonstrated Windows generally X86
Then Double Click if error, repeat with right click on the program you want to run select Run As Administrator
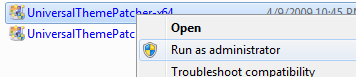
This program will automatically create backups, and in case of mistake or error or default of the old themes can restore back.

And for the last step :
Restart your PC and save the 3rd party themes, at C: \ Windows \ Resources \ Themes
example :

Previously we had to download and extract the download results like the above example. Midnight and Midnight.theme folder copied to the directory C: \ Windows \ Resources \ Themes
that will be like this:
 Then double-click the Midnight.theme ... then automatically you will change themes ...

Previously we had to download and extract the download results like the above example. Midnight and Midnight.theme folder copied to the directory C: \ Windows \ Resources \ Themes
that will be like this:
Good luck... (ThemePack-Gratis)

Entri Populer
-
 Please try Islamic Theme for Windows 7 Version (Complete) , and find a theme that is different from the others, this Themepack is Free . ...
 -
 Below is a collection of collections of a few Best Islamic wallpapers with a choice of format 1024x768 pixels and HD quality to the desktop...
 -
 Pororo the Little Penguin is a kids animated movie designed by Iconix Entertainment, Internet SK, Ocon, EBS with the North Korean company ...
 -
 Islami Background For Windows , actually a continuation of the best islamic wallpapers .. its title at different let me make a rather uniqu...
 -
 A continuation of the previous Islamic theme , I now present to the Islamic Theme For Windows 7 Part 4 , but with the feel of a beautiful c...